The Cottage: Planning the Bathroom


It feels incredibly exciting to finally be able to write a post about our inspiration for a space, rather than on how we’ve made another mess this week! Though that is of course an inevitable part of the process for any room we renovate. If you are following us on Instagram you’ll know that we’ve now made a start on the upstairs bathroom in the Cottage, which we’ll be working on alongside lime plastering the two bedrooms. The bathroom in the Cottage was really in the best condition of all the rooms we’ve worked on so far in the house, but that’s not to say it isn’t without it’s issues.
Damp is harder to spot when hidden by tiles.
After a quick inspection of the room it didn’t take us long to spot a few indicators that there was likely a damp problem here too, such as mould around the windows and rotten skirting boards. A few of the tiles on the floor and in the shower enclosure had also cracked, and given that this room has two external walls that are currently uninsulated, we decided that with the level of work we have put into the rest of the Cottage, we may as well strip this room back too. After all, it seems better to make one enormous mess, rather than make many smaller messes and be constantly trying to restore some calm to the chaos! With a total of 36 rooms to tackle at the Farm, it’s really important to us that we do each room only once, and to a standard where we don’t need to revisit them until the remainder of the Farm is finished.
This won’t be our first rodeo with a bathroom renovation.
We installed a whole new bathroom when we lived at No. 8. Other than having a plumber repair a leak, we handled the demolition, tiling and fitting ourselves (more photos of that here) and did it all for just over £1400. Whilst the bathroom at the Cottage is almost double the size, we’ll be taking a similar view to the renovation, and tiling/installing it ourselves to save a few pennies.
As in every other room here, removing the cement render from the walls is a priority, in order to allow the solid stone walls to breathe and to also be able to add insulation to the room. This will help to resolve some of the damp issues caused by the cement render, we will also be installing a super powerful extractor fan in here to minimise residual humidity, and fitting a new window too. As the window in the bathroom faces the driveway, the window will be frosted glass to give bathroom users ultimate privacy - we don’t want any awkward moments!
Unlike in the other rooms in the Cottage, we won’t be using insulated lime plaster in this room.

The reason for this is simple; we need to be able to tile a portion of the room for a shower, and as tiles and tile adhesive are not breathable materials, there is little benefit in lime plastering underneath them. Instead, we’ll be taking an alternative approach to ensuring the walls can breath, by stripping them back to the bare stone, repairing any lime mortar if needed, and leaving an air gap of 100mm before building a stud wall. We will be insulating between the studs with either hemp or wool insulation, before boarding in plasterboard and tile backer, and tiling/gypsum skimming as needed.
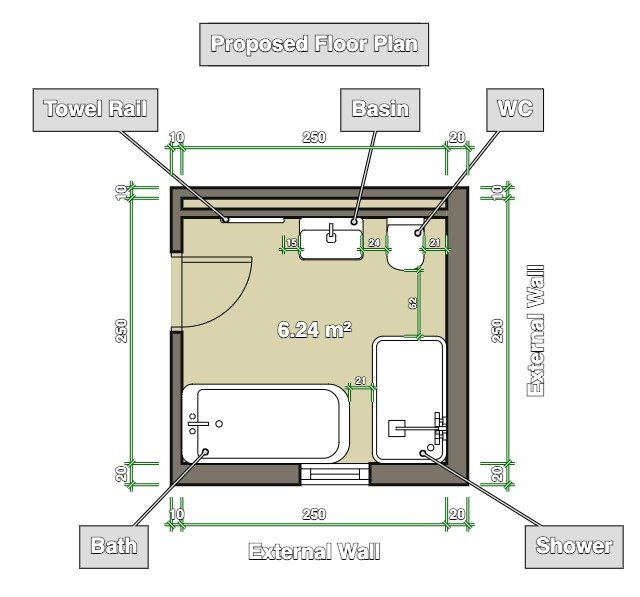
The bathroom is quite a large room, certainly compared with the tiny bathroom at No. 8, and measures 2.5x2.5m. The original layout of the bathroom left a lot to be desired, with a large amount of unused space leaving the room feeling cold and uninviting. With a footprint of over 6 square meters, there is definitely space to bring more personality to this room, so it’s going to be a really fun one to tackle! One of the main issues I want to address in this room is the pipework. As this room has two external solid walls which are cement rendered, in the original layout the pipework for the radiator and soil stack were surface mounted and boxed in. Whilst hiding the pipes in some form of boxing will still be necessary for us, as we don’t want to chisel out the original stone, an additional benefit of building studs will be that we can conceal the pipework within the false walls.
To make the pipework as neat as possible, we’ll build a false wall along the internal wall.
The soil stack will be rotated, and we’ll turn the WC 90 degrees, so it will sit against the new false internal wall, rather on the external wall. We’ll move the basin next to the WC, and shift the towel rail along so it tucks into the alcove behind the door. It will still be easily accessible, but will disguise it a little and help us to make the most of the rest of the room. This wall will be panelled half-height in tongue and groove, with painted plaster above, and a mirror which that I hope will cleverly disguise some hidden storage we plan to build in to the false wall.

Moodboard created to show the concept of the bathroom.
The shower will remain tucked in the far corner of the bathroom, against the two external walls, but by moving the WC we should be able to have a slightly larger tray, giving the room a more luxurious feel. This area will be tiled with some beautiful handmade white tiles we bought before we had even moved into the farm. They have a really soft, organic look from the glaze application, and are similar to what we used in the kitchen back at No. 8. I’m not totally sure on how we’ll lay these yet, either as a brick, horizontally or vertically, as I need to try out some layouts against the tongue and groove to see what works best (if you have any suggestions on this, let me know in the comments section!). We’ll be replacing the existing shower head with a new thermostatic shower and waterfall head, which I’m hoping we will be able to mount from the ceiling to give a real spa-like shower experience.
This leaves us with the space that originally housed the basin and mirror (which I broke quite dramatically this week whilst trying to carefully remove it!). As the Cottage is being designed with the aim of being a guest house for visitors, a holiday rental, and at some point a home for Will and I will whilst we renovate the Mistal, we need to keep in mind that the space needs to work for many different people. The biggest thing I feel that the bathroom is missing, and has enough space to accommodate, is a bath.
Preferably a very beautiful, freestanding bath, with a very luxurious feel!
If you follow me on Instagram, you’re more thank likely sick of hearing me talking about wonderful baths, but indulge me for a few minutes more. I’ve found this week that baths can be quite an unexpectedly divisive topic. People from outside the UK have been astonished that we would choose to fit a bath over a double sink vanity! I always find it so interesting how different things are perceived or expected as normal in different parts of the world. Here in the UK though, I would say with a certain level of confidence that people would generally prefer access to a bath over an extra sink. After all, you can wait your turn for a sink, but it’s no fun at all to try and wedge yourself into a sink for a wash… something that we did for several months at our last reno whilst we were working on the bathroom!
My vision for the bath in the Cottage is to have something that links tradition with contemporary styling.
The Cottage dates back to 1883, and directly above where the new bath will sit is some boxing in against the ceiling. I’m very much hoping this conceals a beautiful old Oak beam! If this is the case (fingers crossed!), we will expose the beam and clean it up, and so the bath that sits underneath it will need to compliment it whilst also holding its own as the main feature of the space. Whilst I love the sleek shapes of modern freestanding baths, I think these would be too slick alongside the beams and tongue and groove, and I really want to introduce some warmth into the space through colour.
The solution, of course, is a freestanding roll top bath, painted in a pop of colour.
Currently, I’m thinking of using Portland Stone range from Little Greene paints on the tongue and groove panelling, and so would like a tone that will sit alongside the warm neutrals. I love colour, and part of my day job as a textile designer focusses on designing colour schemes, so I find this part extremely exciting! I’m leaning towards a strong, heady burnt orange for the bath, which will be balanced by a painted mirror hung at the other side of the room, so your eye will travel rather than settling on the bath (a good trick for ensuring you read a room scheme as a whole, making it feel more cohesive). For the shape of the bath itself, whilst this will very much depend on what we can find for our budget, my preference would be for a freestanding bateau style bath, rather than something with claw feet. This is just as I can imagine myself constantly bumping into or tripping over claw feet, plus having a bath that’s sits directly on the floor means you can’t see any of the pipework concealed underneath.
One of the things I love to do when creating a scheme for a room is to begin to build a moodboard, so I can see how the different elements I would like to include will interact with each other. I’m a very visual person, and can visualise a space in my head, so I find this step of the process really helpful to explain my ideas to Will and my parents. Building the moodboard took me down a real rabbit hole of gorgeous baths, so I’ve compiled a few of my favourites below. There’s an absolute wealth of inspiration out there for beautiful bathrooms, from both instagram and Pinterest, as well as directly through bathroom brands, who often have an archive of inspirational imagery on their sites. If you’re interested in seeing more of my inspiration for this room, you can see more of this on my Pinterest board.
I’d love to hear your thoughts on the design of the space and the concept so far. If you have any comments or ideas, pop them below. You can also keep an eye on our Instagram page to watch the progress, as we’ll be working a lot on this room over the next few weeks!