Renovating our Bathroom
AD. This post contains Affiliate Links, which means that if you choose to buy a product via a link in this post, we will receive a small commission from the purchase, and references to products received as part of a collaboration on Instagram.


Exactly 8 months after beginning work on the bathroom in the Cottage, I am absolutely thrilled to be able to say - we have finished our first room at the Farm! Yep, the bathroom has been well and truly ticked off our to do list. We still have a little bit of styling and fiddling to do, but these things come with time, and we’re now at a point where the real, mucky, dusty renovation work is well and truly behind us for this room. As we put this space rather satisfyingly on the ‘done’ list, it’s a good opportunity to look back over the journey and take a moment to revel in what we have achieved.


When we began work on the bathroom, like all of the rooms here, there wasn’t anything inherently ‘wrong’ with the space at first glance. It was a generous sized room, with neutral marble-effect tiles on the walls and floor, simple fixtures, and magnolia walls and woodwork. The room was around 2.5m squared, with a shower, sink, WC and towel rail situated in each corner of the room respectively. The room felt sparse, with a large area of unused space, and it was quite tired. In all honesty, we could have left it as it was, and it would have been fine, but when you’re doing the amount of work that we are, ‘fine’ just isn’t something we subscribe to. We were putting so much work into the other spaces in the Cottage, it truly felt like we would have let ourselves down if we didn’t make this a wonderful space too.
We decided the only option was a dramatic back-to-stone-and-start-again renovation, because…
Whilst the room was visually ‘okay’, the finish was poor, and a few years of use had seen the tiles crack and skirting begin to rot.
The design simply wasn’t what we would choose, and didn’t reflect our tastes or the standard of finish we wanted to achieve in the Cottage. A simply tart up with a lick of paint wasn’t going to hide that the bathroom was a tired and in need of an overhaul in the next few years.
Like the rest of the Cottage, the walls of the bathroom were uninsulated, which in a stone house in an exposed location in North Yorkshire meant damp walls covered in condensation. We knew that we needed to get the walls insulated, and to do that we would need to rip out the existing fixtures.
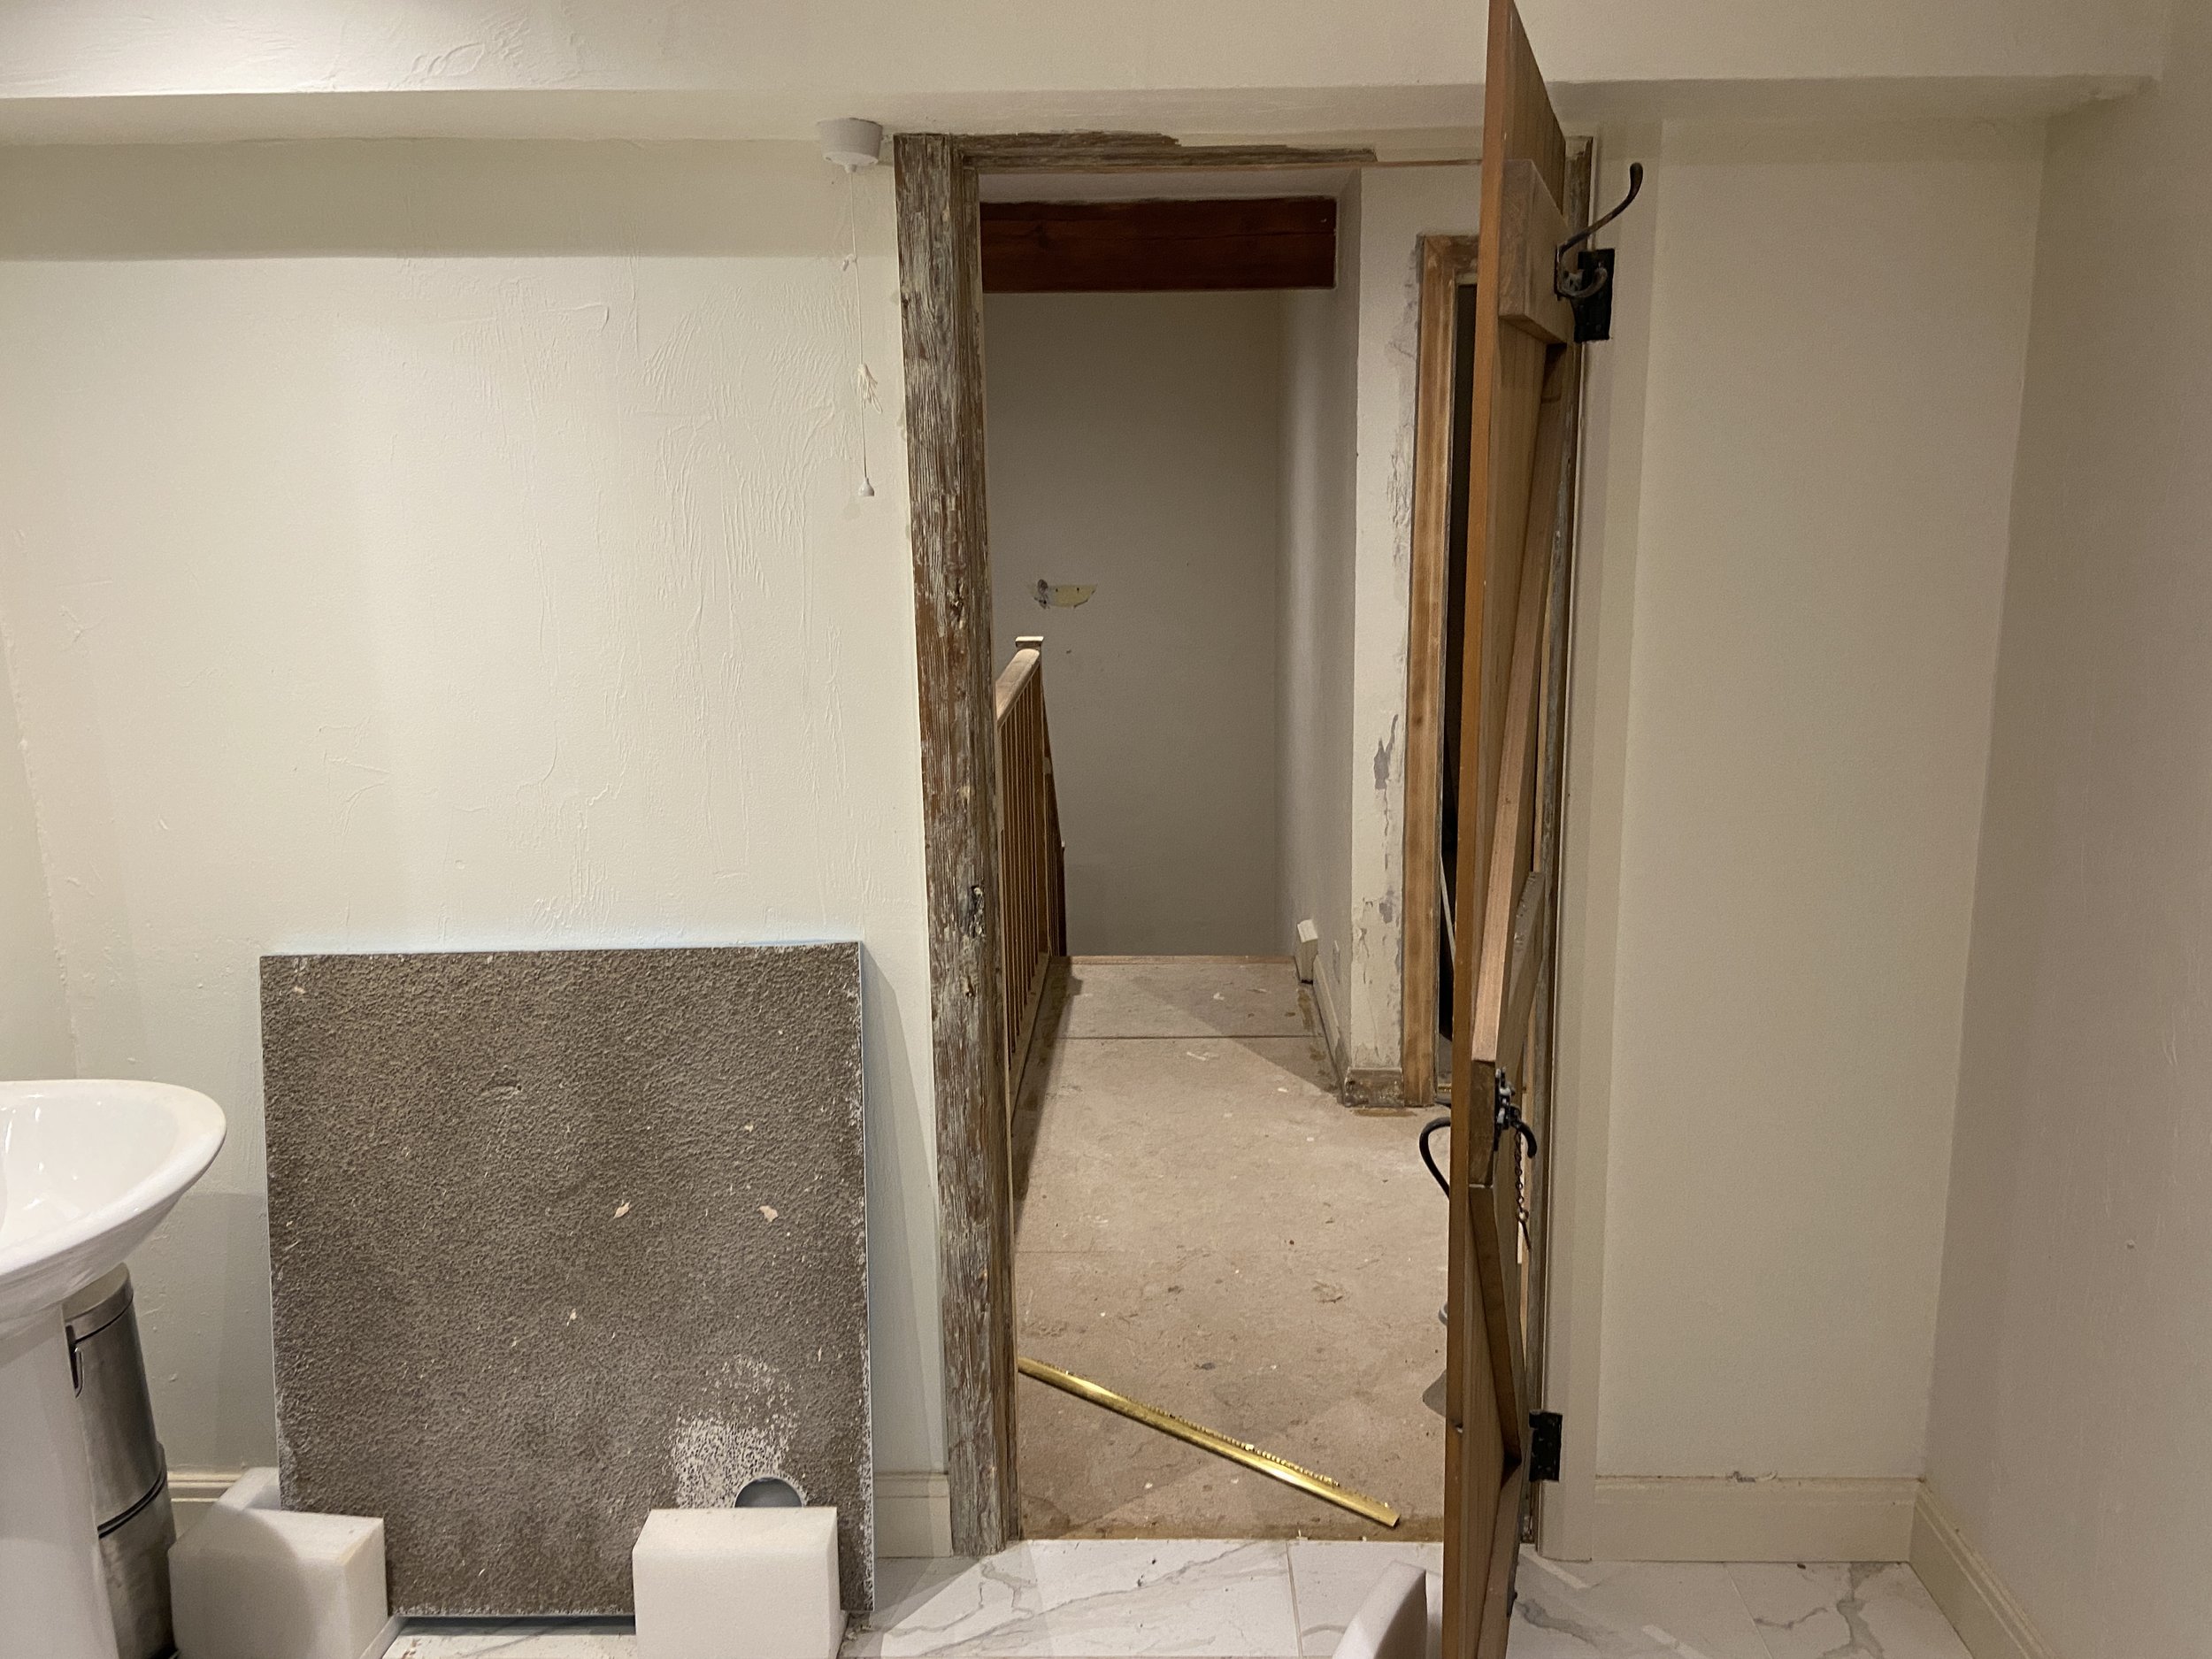
With the decision made, the first step, as with any major reno project, would be to strip the room, and so we got started! We took up the floor tiles first, and then worked our way around the room, removing the old WC, sink and shower. The shower screen was a bit of a beast to remove, and took three of us giving it a good yank to get it off! We managed to get it out without breaking it, and as it was a great size and good quality, decided to hang on to it and repurpose it when we could.
The next job was to uncover some suspicious-looking boxing in that stretched all the way across one wall, above the doorway to the bathroom. I had a feeling there was some sort of treasure to be found underneath, and a quick afternoon spent with a lump hammer, cold chisel and crowbar proved my suspicions to be correct, and hidden under a coat of soggy plasterboard was a beautiful, original pine beam. Having been shrouded in plasterboard without the ability to breathe, the beam was in need of some serious TLC - it was filthy, wet, growing mushrooms in places, and riddled with woodworm (thankfully not active!). Covering old timbers with plasterboard is never a great idea, and we knew that covering this one back over would likely lead to totally disintegrate, and so we decided to keep it exposed, which became a fundamental element in the planning of the space.
With the beam newly exposed, and the fixtures removed, we set about the next challenge of removing the textured cement render from the external walls. I won’t delve into the reasons for doing this too much, as I’ve written a few posts in the past about the damage that cement can do to a solid-walled property like ours (if you’d like a bit more information, my post on Dealing with Damp is a good place to start), but for both reasons of improving the ability of our walls to breathe, and to add much needed insulation to the walls, it all had to come off. We used our standard toolkit of SDS drills, cold chisels and lump hammers to remove the render, and then chipped out the old fractured, broken and crumbling mortar.

Thermafleece insulation system
We repointed the external walls with lime mortar, using NHL 3.5 Cornerstone Drymix from Cornish Lime, and whilst we were doing that, I began to make plans for the space (covered in this post). We had already decided that we weren’t going to use lime plaster in the bathroom, since we were planning to use a combination of MDF panelling and tiling on the external walls, which aren’t breathable materials, and so aren’t really suited to application onto lime. Instead, we decided to take a different approach that would still allow our walls to breathe, by using the Thermafleece solid wall system.
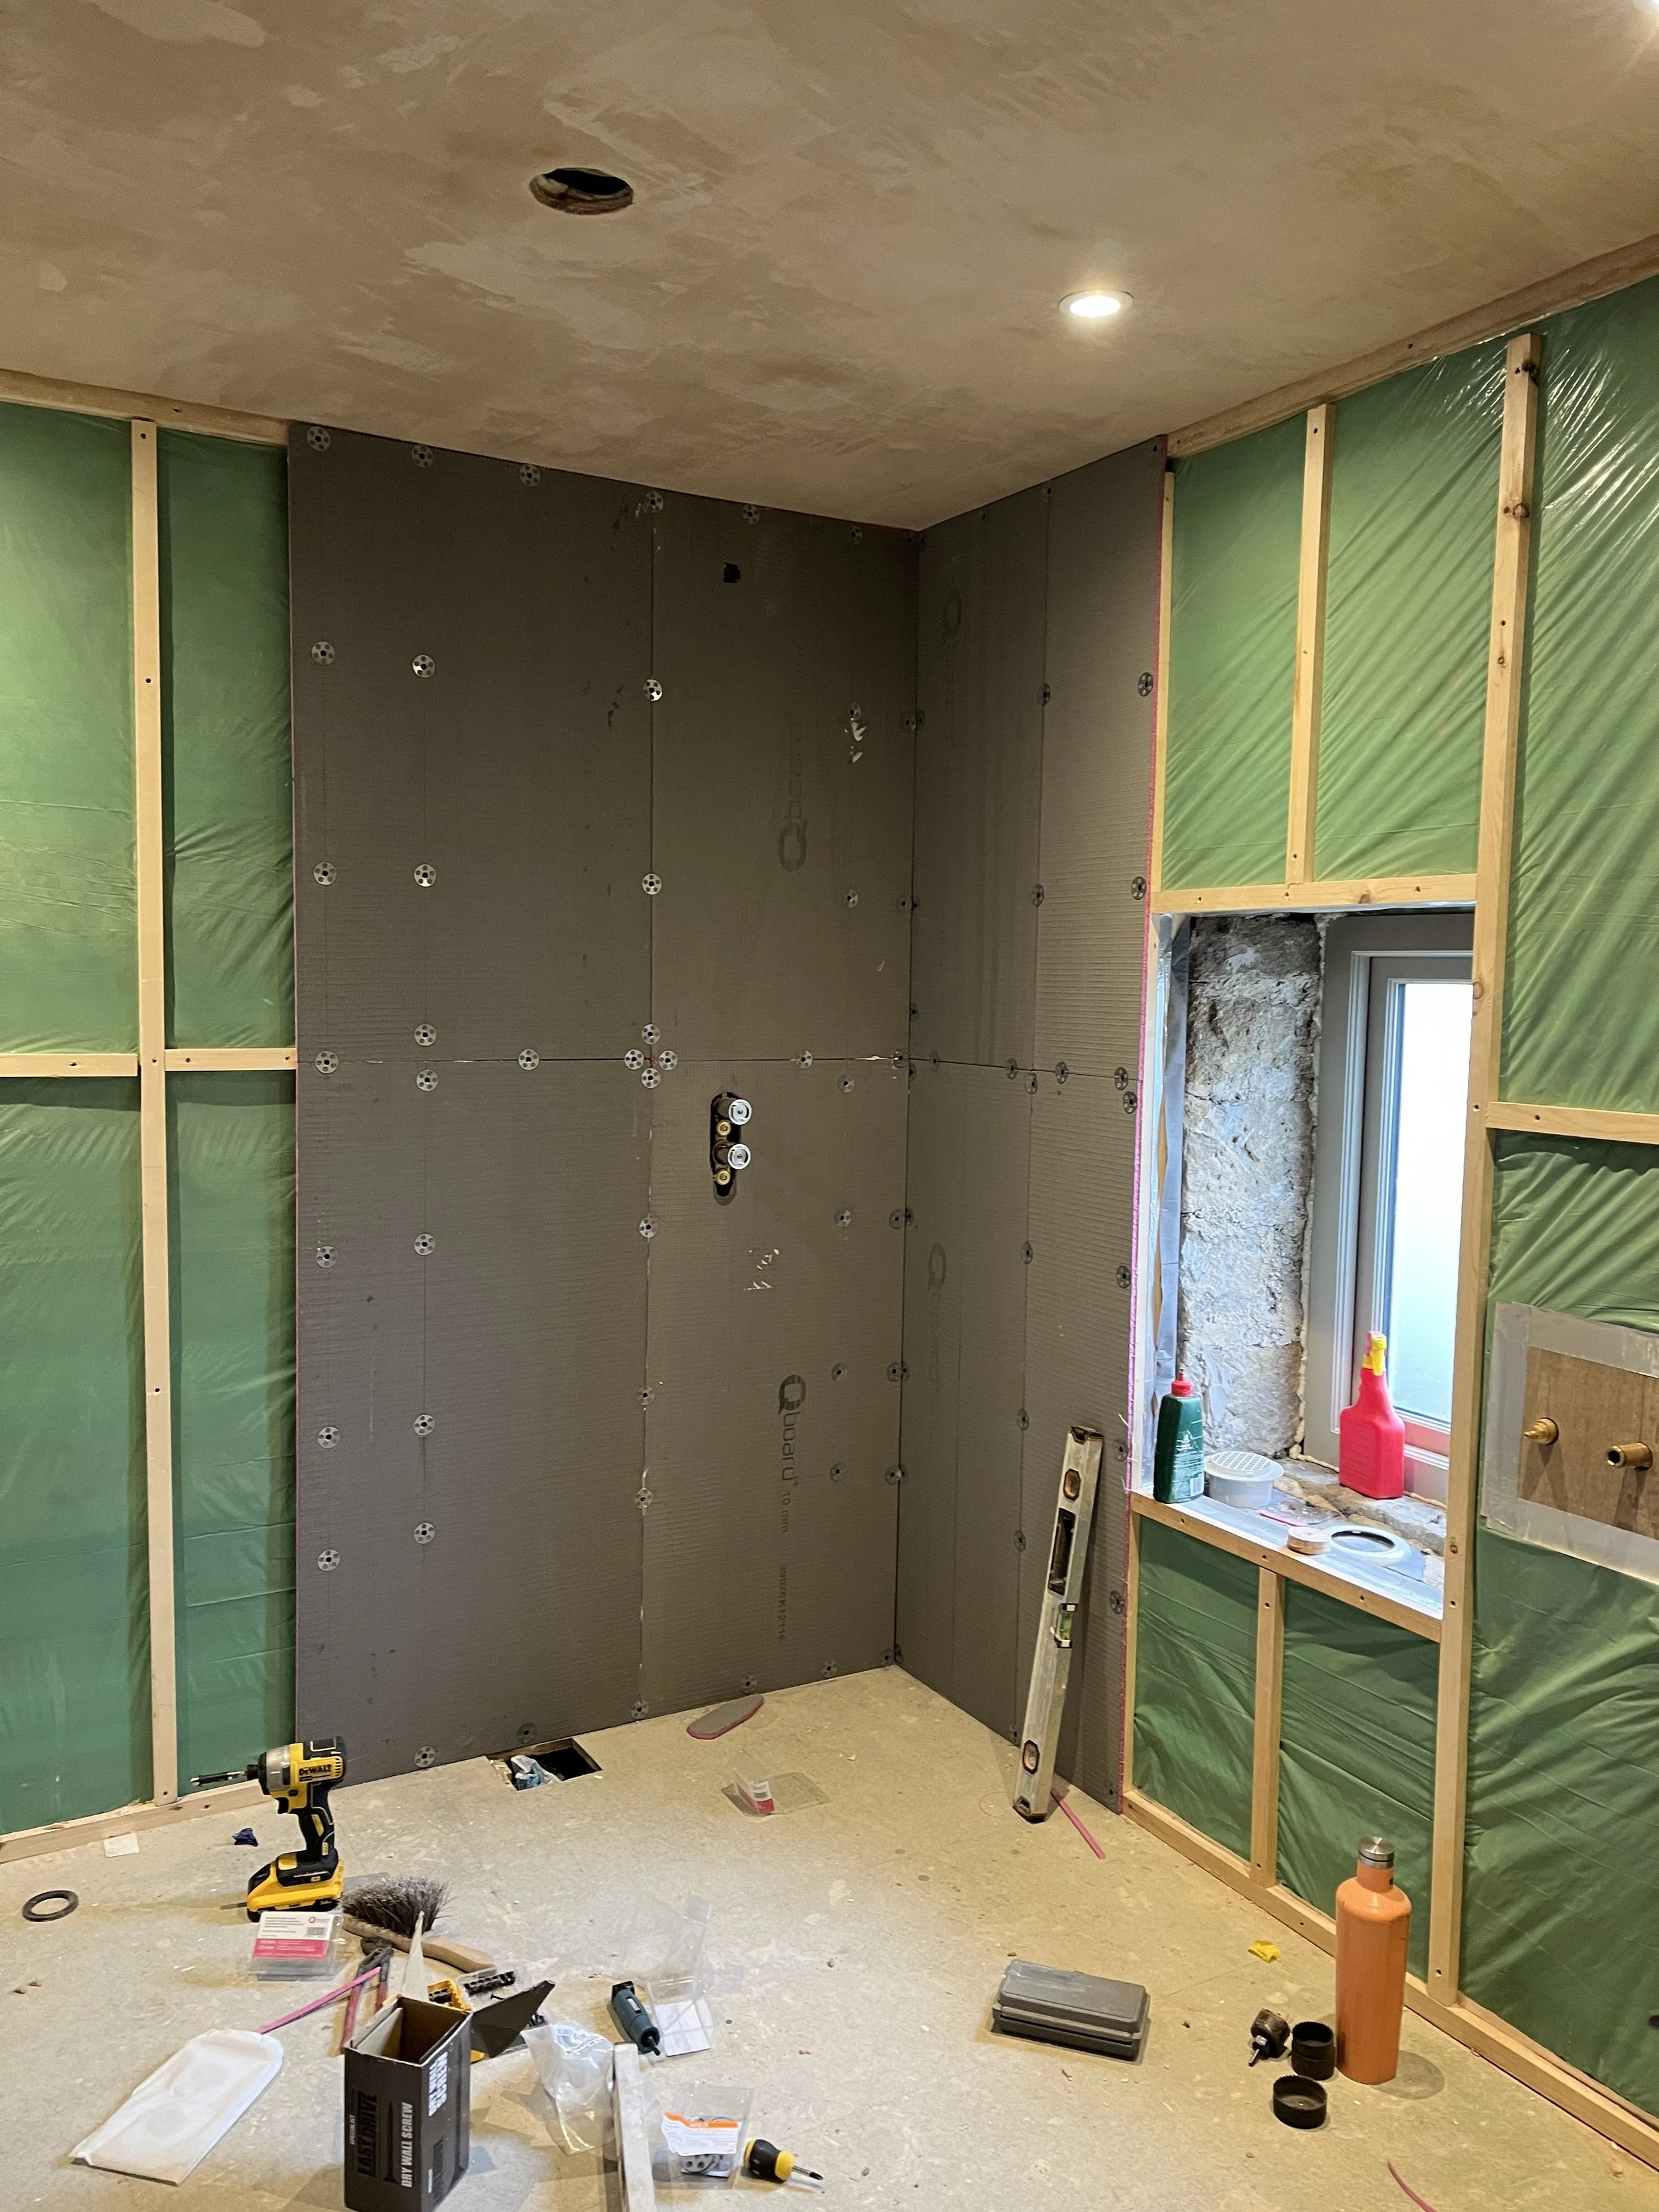
Thermafleece is a natural fibre insulation that combines sheep’s wool with recycled fibres to create breathable insulation, . To be able to effectively use the system, we needed to first build a timber frame around the external walls to house the insulation. Once built, the frames would be covered with a Breather Membrane on the cold side (the side against the wall). The pipework for the bathroom could then be fitted, and then the remaining gaps in the frame would be filled with Thermafleece insulation panels and covered with a Vapour Control Layer. We built the frames relatively quickly using studwork timber, and Will set around plumbing the bathroom. He learnt to plumb, as we learn most of our skills, from lots of research and watching a range of videos on YouTube. We used a push fit plumbing system with flexihose to keep things simple, and got all of the pipe work in place for the shower, WC, sink, radiator… and a new addition - a bath!
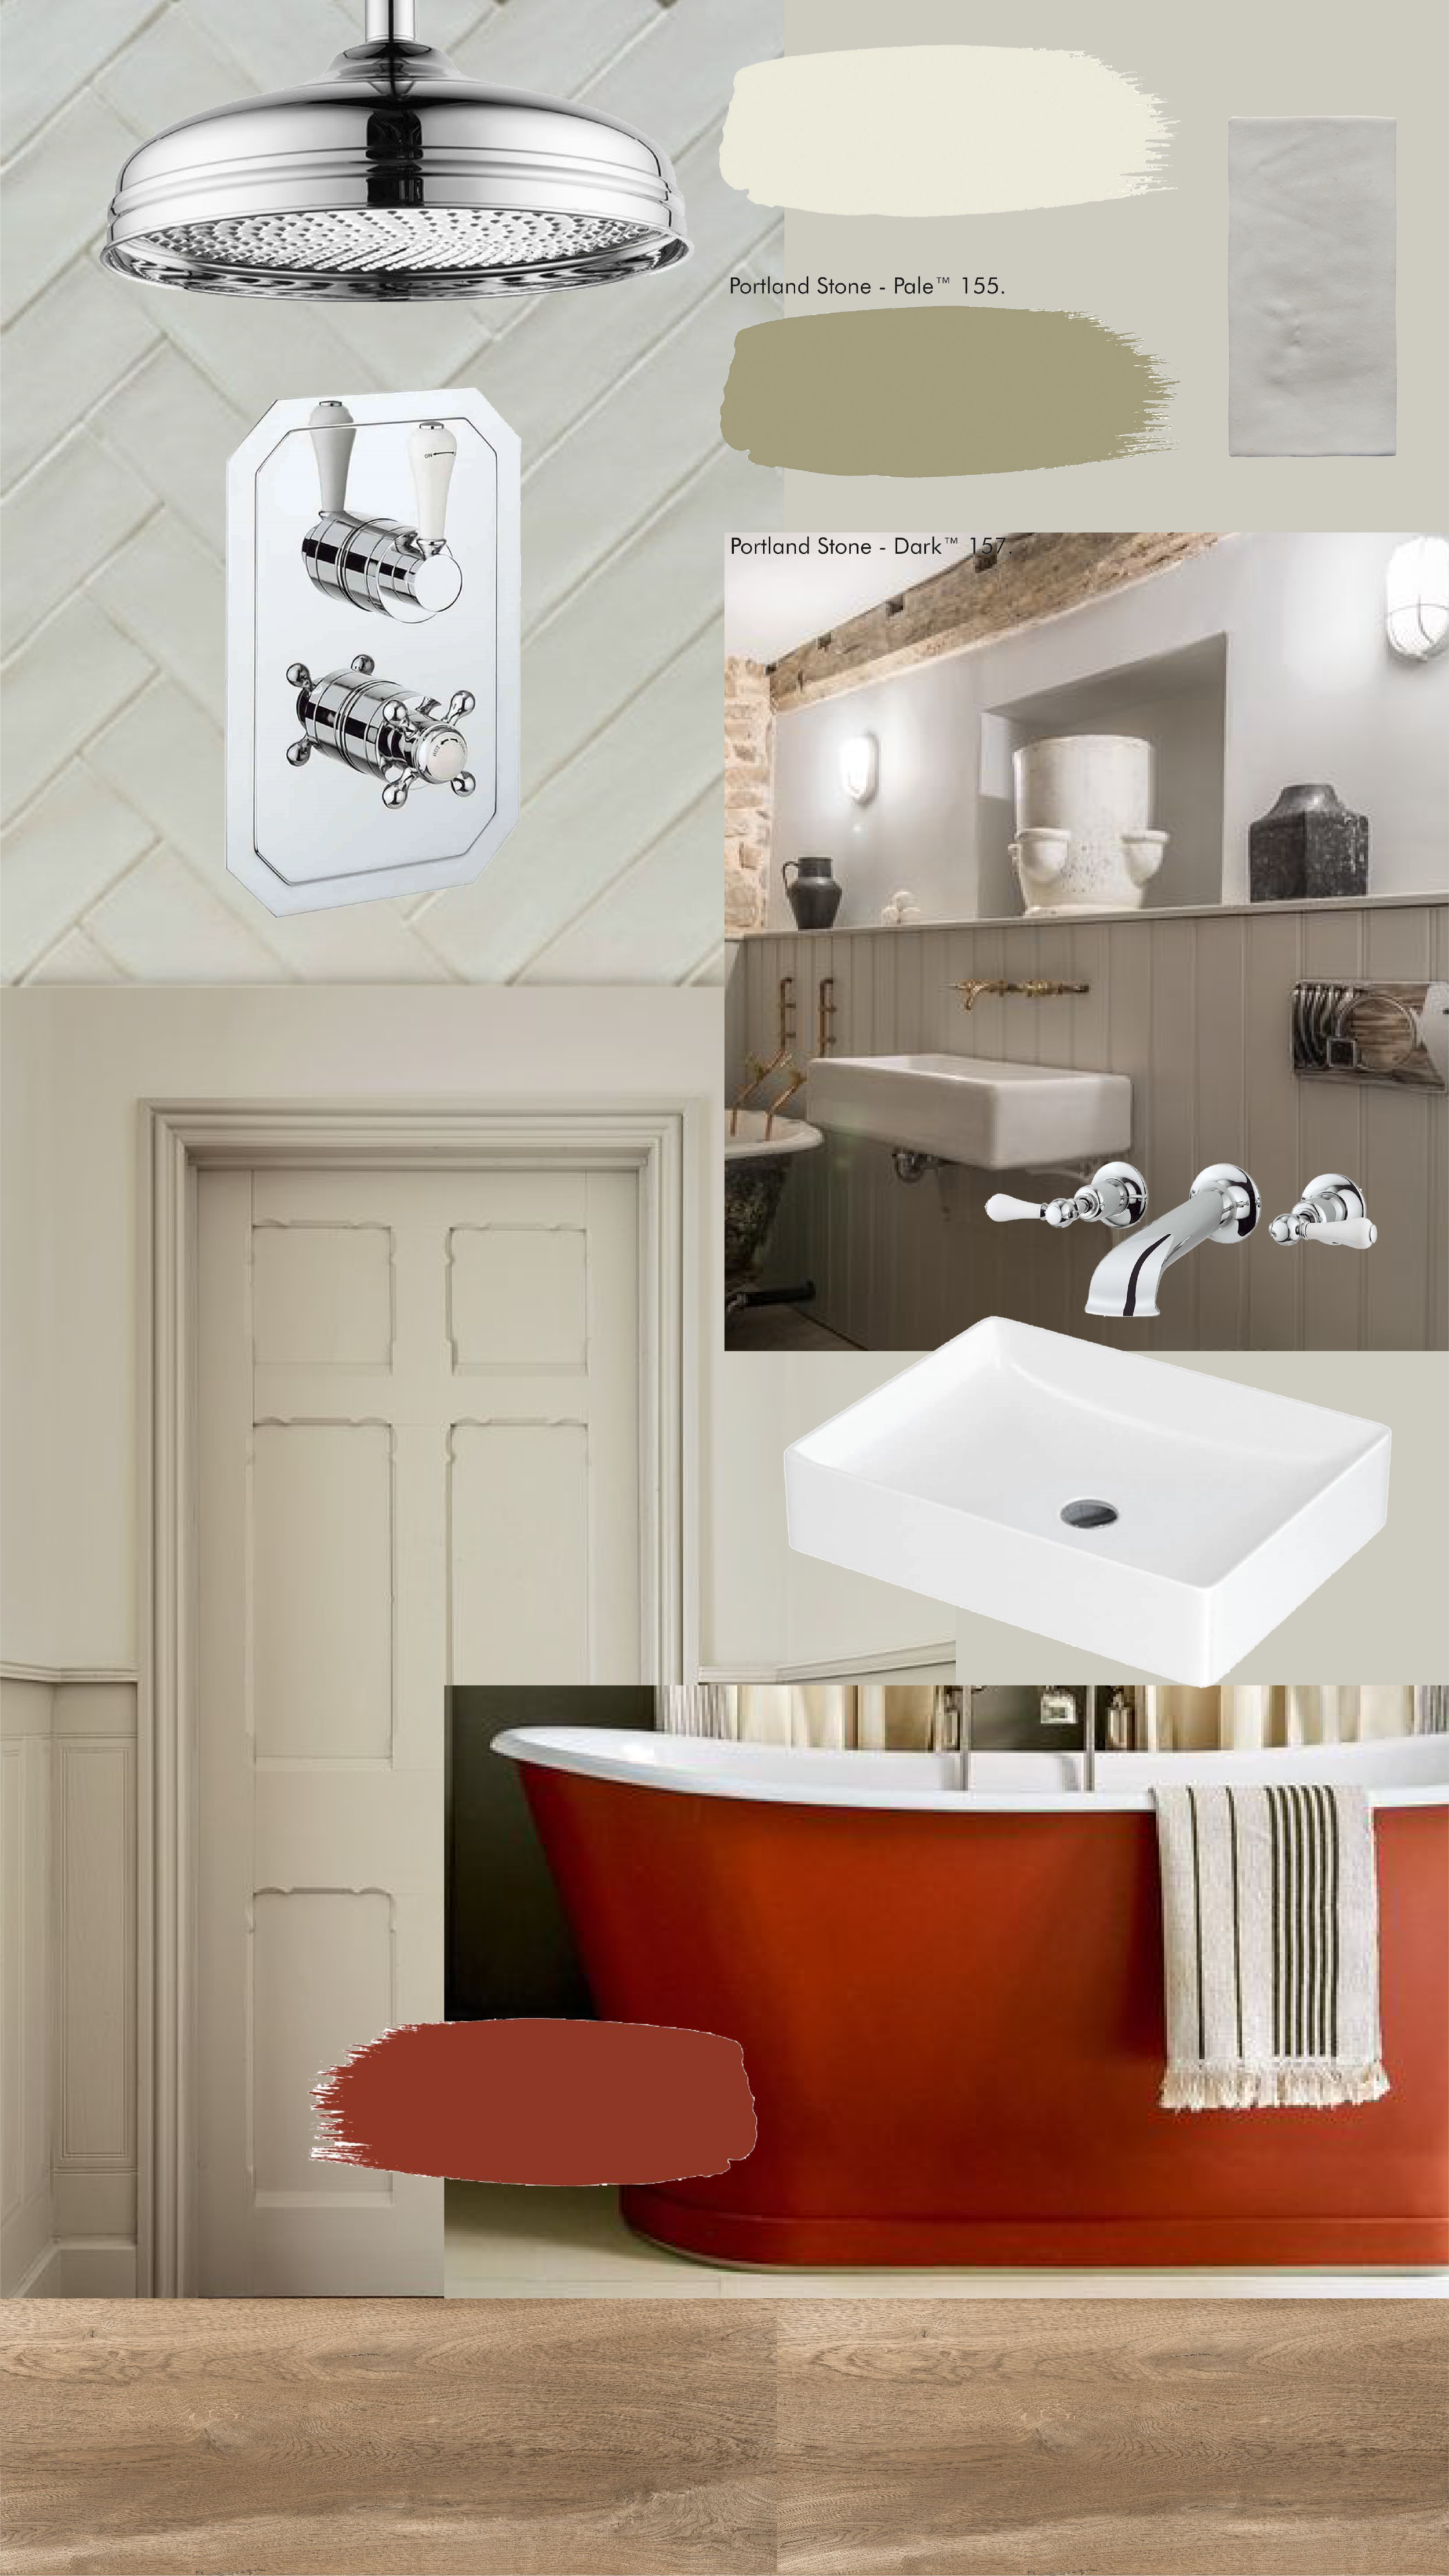
We had already made arrangements by this point to work with Drench.co.uk on the bathroom, who provided the fittings and fixtures to us (AD/PR Discount), and we had chosen a range of items from the Crosswater Belgravia range, that sat perfectly within the modern-yet-classic look we wanted to achieve. I had also set my heart on a beautiful Boat bath from BC Designs, and had ordered the 1580mm size in a gorgeous red-orange; Drummond by Little Greene. Once the plumbing was finalised, we took delivery of the fixtures and set about temporarily fitting them, to allow us to test for leaks before the Novia 1000g Vapour Control Layer was fitted. Thankfully, testing went well, and we only had a few very minor leaks had to be repaired before the VCL could be fitted… which led to the bathroom becoming a fetching shade of Kermit the Frog green!
The hardest work was now done, and we were now firmly back in our comfort zone with plaster boarding the walls and sanding back the old beam, which I refinished in Osmo Oil (more on that in my post on Restoring Wooden Beams). We used Qboard, a type of tile backer board to board out the shower area, which was to be tiled, before we began skimming the walls and ceilings with gypsum plaster. For the floors, we laid Hardiebacker Board over the existing OSB flooring, and primed it with PrimerG to prepare it for tiling. We began to fit the MDF tongue & groove, before pouring Mapei self-levelling compound over the Hardiebacker board to create a a level surface for tiling.
Tiling the floor and the shower enclosure was a super speedy job, using Mapei tile adhesive, simple stone effect floor tiles and zellige style metro tiles we bought from Facebook Marketplace, grouted using Mapei grout. Painting was another speedy affair, using absolutely gorgeous paints from the Little Greene range. I chose to use the Portland Stone range throughout the room - a palette I absolutely adore and am using across the Cottage. We used Portland Stone Pale 155 for the walls and ceilings, complemented by Portland Stone 77 for the woodwork and panelling, and used Portland Stone Dark 157 to add a subtle weight to additional features like the painted vanity unit we created from a secondhand washstand.
This left us with some small, but time consuming and fiddly jobs to get the bathroom finished, like fitting the taps, shower, valves and the enormous shower screen we had removed months prior. Not to mention transforming a dated pine washstand to a gorgeous sink unit with a lick of paint and some clever plumbing (more on that to follow in a separate post!), and pimping up some old picture frames and a mirror. There was really just one thing left to do… fitting the most glorious bath you ever did see!
There was a tiny bit of nail biting as we manoeuvred the bath through the (tighter than anticipated) doorway and into the room, but thank goodness we managed it without causing any damage to either the bath, the newly decorated room, or ourselves. We plumbed her in, and I’m sure you’ll agree the results are absolutely magnificent! I’m so proud of this space, and all the hard work we put into making it a truly stunning space. Safe to say that until the Cottage is ready to let out, Will and I will be making the most of this space!


Products used:
Bath - BC Designs Double-Skinned Acrylic Boat Bath - 1580 x 750mm
Bath Taps - Crosswater Belgravia Lever Wall Mounted Bath Spout
Bath Waste - BC Designs Exposed Bath Plug & Chain Waste with Overflow Pipe
Basin - Britton Bathrooms Shoreditch Quad Countertop Basin - 500mm
Basin Taps - Crosswater Belgravia Lever Wall Mounted 3 Hole Basin Mixer Tap
Basin Waste - Clearwater Click Clack Unslotted Basin Waste
Bottle Trap - Crosswater Standard Bottle Trap - Chrome
Shower Head - Crosswater Belgravia Fixed Shower Head - 12 Inch/300mm - Polished Chrome
Shower Arm - Crosswater 330mm Curved Shower Arm - Polished Chrome
Shower Valve - Crosswater Belgravia Concealed Slimline Thermostatic Lever Shower Valve
Shower Tray - Drench MineralStone Low Profile Rectangular Shower Tray - 1100 x 700mm
Shower Waste - Drench 90mm High Flow Shower Tray Waste
Toilet - Britton Bathrooms Curve2 Rimless Back to Wall Toilet with Soft Close Seat
Cistern - Drench Pneumatic Dual Flush Concealed Cistern with Polystyrene Jacket & Chrome Button